Wordpress - change admin login

Posted by Planeta Srbija | 30.5.08 | | 3 comments »

Wordpress is one of the most popular CMS and everyone by default has the same login as "admin". It's one of good ideas to change it to make hackers life more complicated. If they know your username then it's only question of time to "guess" your password using brute force methods.
The easy way to change your "admin" username is to logon to your phpMyAdmin account. You did it when you made a database before installing Wordpress.

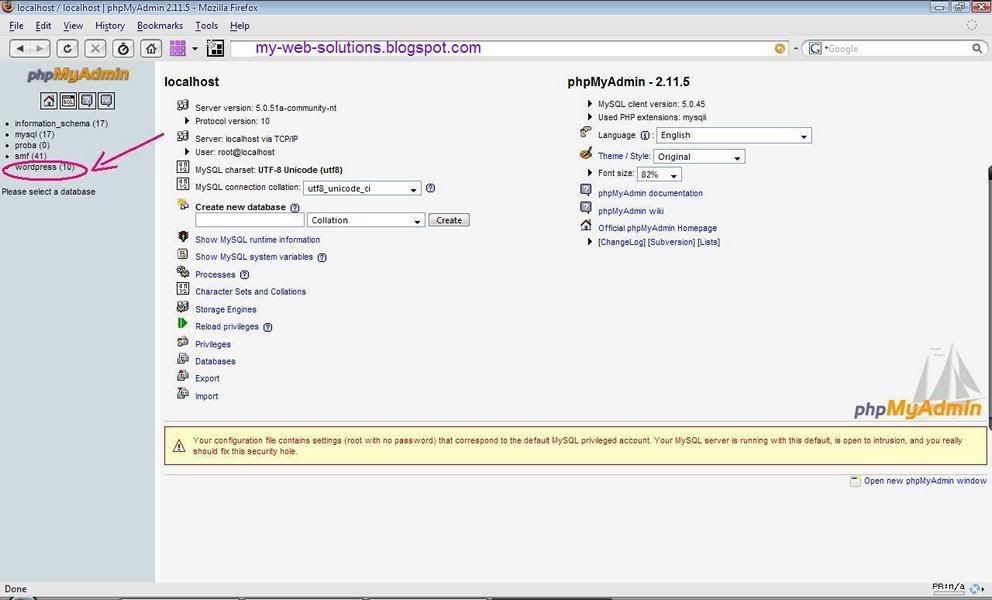
After you did that, on your left sidebar you will see all databases you use. Click on your Wordpress database like on Fig.1


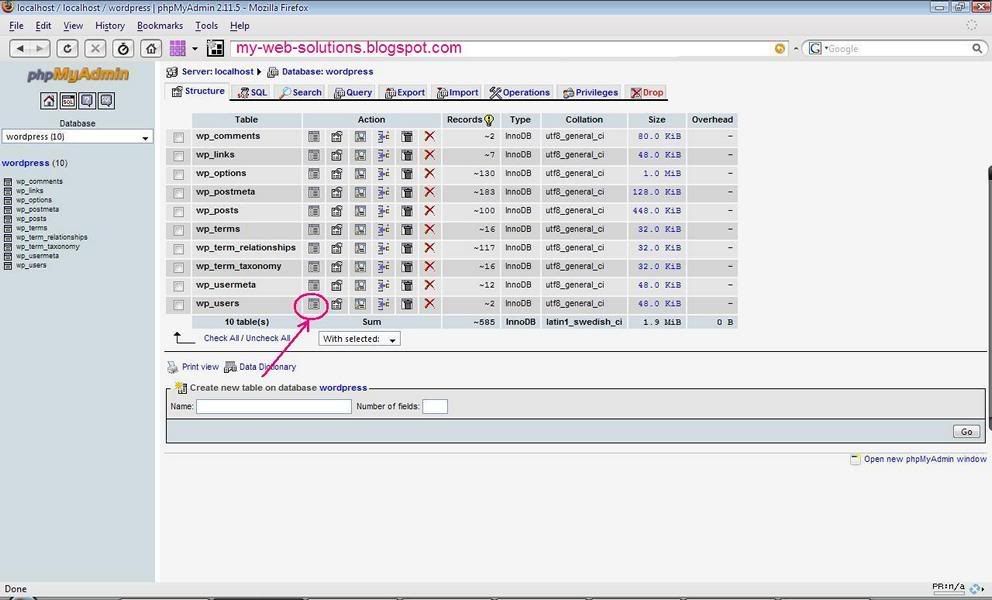
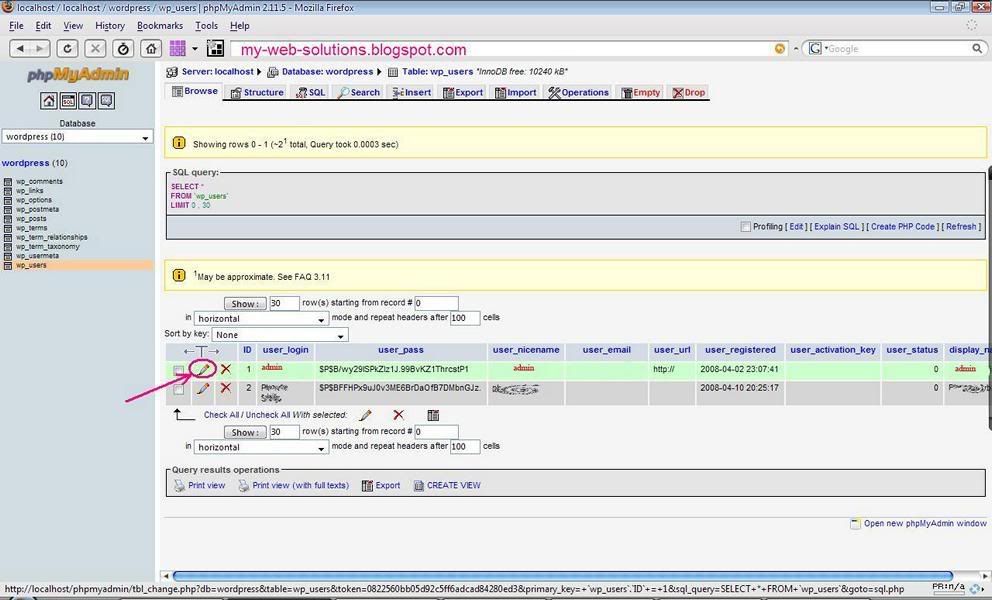
You will get screen shown on Fig.2. Click on the shown icon beside the wp_users table:


After you get screen shown on Fig.3 click on pecil icon for admin.


Now change fields 1, 2, and 3 (1 and 2 would be your new login, 3 is what is shown on your blog when you publih a post). It's not a bad idea to name 3 as something else (security reasons) so your real username would not be published to everyone.


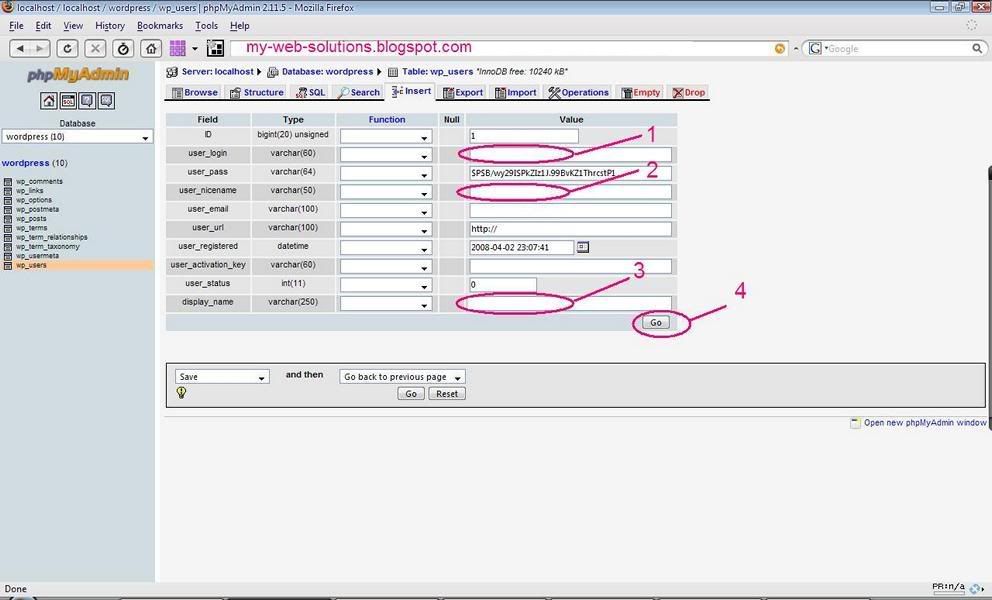
After that click on 4 and that's it. Enjoy!

Read More......

WordPress RSS Category Feed

Posted by Planeta Srbija | 8.5.08 | | 1 comments »

RSS is getting more and more popular every day. People rather like to get informed about new posts instead wasting time searching blogs and sites for frequently updated content. People subscribe to RSS service by entering RSS URL into "RSS Reader", "Feed reader" or an web or desktop based agregator. But sometimes RSS can do more harm than good to your site statistics.

If you write about many different things on your WordPress based website you can imagine that not everybody is interested on all new posts on your blog. Most templates, if they have an RSS icon at all, don´t give this option for categories. But this is already built in function of WordPress! I just adore this CMS (content management system)- it has no limits and its so simple!

Subscribing to Categories:
It´s very unlikely that a lot of people are going to use this tricks by them selves. You will have to place somwhere on top of category an icon with hyperlink.

First, you have to know your category number. Click on any. You will get something like this: http://www.your-domain/?cat=16

Now,the format of RSS feed for this category would be:
http://www.your-domain/?feed=rss2&cat=16

If you choosed "custom permalinks" in your WordPress settings, you will have to use the complete path to your category, and the RSS feed will look about this:
http://www.your-domain/category/maincategory/subcategory/feed

Read More......

Countdown Widget

Posted by Planeta Srbija | 7.5.08 | | 3 comments »


There are so many widgets, but today I discovered a perfect one! You can add every single detail (year, month, day, hour, minute), you can add your logo and even a URL to your page (which is optional). And it looks very nice. Wigdet is here, made by widgetop. Just enter the details, copy the script code and paste it into your website or blog post. Enjoy!

Read More......

Do you miss a beautiful option of WordPress to show only introduction to a post on a frontpage, and after that to get "read more" hyperlink which will take you to the rest - like I did it on my blog?

Well, Ramani made the perfect solution for this and he explains in his blog how to get it working. Follow his instructions exactly (like I did) and magic happens!

Read More......

Blogger, unlike WordPress, doesn´t have Categories – a kind of contents of your blog . This is very important thing because your posts should not only be ordered hronologicaly on the main page but also hronologicaly within the categories. One blog can deal with a lot of your interests (sport, music, art ...), and your visitors will love if posts are categorized.
Some time ago there was a skript for tweaking around (which never worked for me). Now, you can "Add page element" for your sidebar. Choose "Labels" and name it "Categories".

To get new Categories to shown up, after writing a post, put also "Labels" - a word which will be a "subcategory", ie: "Music" or "Sports".

Read More......

There are a couple of ways to show AdSense on your blog post:

1. This is a pretty new option: in your Layout, in a Blogpost part, click on "edit" hyperlink in zhe right corner. You will see this screen:

Photobucket

Select "Show Ads between posts" - and you will get setting options for AdSense - it´s size, colors and your UserID-a. This is so simple, there is no need for further explanation.

If you still don´t have an AdSense account you can easily register using your username and password for Google (and for blogger).


2. There is also a tweaky method for inserting AdSense directly into post body. Important: Google allows not more then three AdSense units on one page, counting also those shown in your sidebar. So don´t get confused if you have a lot of post and AdSense shows only in the first 3 of them!

First you have to copy your AdSense-unit script. You will reach the best result if you choose a small unit, maybe the smallest is the best one. Then, you have to make following changes (don´t worry it´s not a real "any change of code"):

< with &lt;
> with &gt;
" with &quot;

Now, you have to insert AdSens script into your blogger template. Go to Layout/Edit HTML, and checque “Expand Widget Templates”. (this is a must!)

If you want your AdSense shows in left upper corner, put AdSense script into this place (you can search complete HTML code using Ctrl+F in your browser):

<div class='post-header-line-1'/>
<div style='float:left;margin:5px 10px 15px 20px'>
AdSense Code
</div>
<div class='post-body'>
<p><data:post.body/></p>
<div style='clear: both;'/> <!-- clear for photos floats -->
</div>


The part "float:left" can be changed to "float:right" and AdSense will show up in right corner of your post. You can also change margins to achieve the desired distance between AdSense and the rest of your post-text.

Read More......

Skype secret smileys

Posted by Planeta Srbija | 3.5.08 | | 0 comments »

Skype is my favorite communication method with the "rest of the world" these days. Sometimes is a smiley better then a written word. Well, at least it´s more conveniant. There is a pretty small choice of emotions (smileys) within a regular Skype list, but you can use those hidden ones by typing following:


  • (mooning)
  • (finger)
  • (swear)
  • (rock)
  • (smoking)
  • (drunk)
  • (poolparty)
  • (toivo)
  • (bandit)
  • (headbang)
  • (fubar)
  • (tmi)
  • (bug)
  • (heidy)
  • (myspace)

(flag:rs) ... (flag:at) ... (flag:ch) ...

Read More......

Redirection

Posted by Planeta Srbija | 2.5.08 | | 0 comments »

Redirektion is "pull over" from one web page or web site to another.
You can use your Wordpad or Notepad to paste in a following code, save the file exactly as the old, not existing web page, or name the file "index.php" if you want to redirect from one domain to another:

<?php
header("Location: http://www.example.com/");
exit();
?>

If the page did not had the extension ".php" but ".html", then make a new .html page and between

<head>
.
.
</head>

insert following:

<meta http-equiv="refresh" content="N; URL=http://www.example.com">

and "N" stands for number of seconds until redirektion.


For redirect purposes you can also use this script. Put it above first
<html> flag, or between <HEAD> and </HEAD> tags:

<script language="javascript" type="text/javascript">
<!--
window.location="http://www.example.com/";
// -->
</script>

Read More......

First steps in HTML

Posted by Planeta Srbija | 2.5.08 | | 1 comments »

HTML works pretty logical for us humans. It's a kind of text which browsers read from top to bottom and from left to right. First thing you will notice is that every command starts with "<>" and ends with "</>". It's called TAGS. The complete list of tags is shown here.

But you can learn about the tags "on the fly" and use design view when opening a Dreamweaver. You can also use split view and watch what's heppening in the upper screen (what tags appear) when working in the lower. Very important is that every HTML document starts with:

<html>
<head>
<meta http-equiv="Content-Type" content="text/html; charset=utf-8" />
<title>your-page-title</title>
</head>
<body>
.
.
.
and ends with:

</body>
</html>

Every opened tag must be closed at some time. Opening tag is for example: <title> and closing tag is: </title>. You should close tags by exactly the same order they've been opened. And yes, you can use multiple tags one after another.

In my first post I suggested the page structure with banner, left sidebar for navigation thru the web site and main central "window" for everything else (text and pictures).

We need a table. In Dreamweaver (FrontPage or Expression Web is pretty similar) go to: Insert/Table. Choose 2 Rows, 2 Columns, Table width: 800 pixel, Border: 1 pix, and than click OK.

Selact first row, right mouse, go to option "Table" and than click "Merge". Then pull the middle line of the second row to the left, lets say to 200 pixel. Now we have our main structure. And the source code in the upper window (if you use split view) should look like this:

<!DOCTYPE html PUBLIC "-//W3C//DTD XHTML 1.0 Transitional//EN" "http://www.w3.org/TR/xhtml1/DTD/xhtml1-transitional.dtd">
<html xmlns="http://www.w3.org/1999/xhtml">
<head>
<meta http-equiv="Content-Type" content="text/html; charset=utf-8" />
<title>Untitled Document</title>
</head>

<body>
<table width="800" border="1" cellspacing="0" cellpadding="0">
<tr>
<td colspan="2"> </td>
</tr>
<tr>
<td width="200"> </td>
<td width="594"> </td>
</tr>
</table>
</body>
</html>

You see, a lot of code was added automaticly. You can place your mice pointer to any of those table cells and insert whatever you want to. In our left sidebar we will put some menu items. Just write it like you would do it inside a MS Word table. For example:

Home
About us
Page no. 1
Page no. 2
Useful links

Note: if using Ctrl+Enter after each word (menu item) there won't be an extra empty row between rows.

Connecting pages of a web site with each other:
It's called linking. In our sidebar we certanly need links to other (future pages of our web site). Select the first word "Home" and then go to Insert/Hyperlink. In the URL field type the name of your first page, which is always "index.html" or "index.htm". URL is in this case: "http://www.your-web-site/index.html". Do it with other "menu items" the same way, but don't leave any space between words in web page names. For example, name the next page as: About_us and link to it like: " http://www.your-web-site/About_us.html". Or yust for testing purposes link it with browse to any other local file on your PC, like .doc, .pdf or other .htm file.

Playing around with your web editor you will pretty soon find out how to change cell color, font size, insert image..etc. You want to read more about it: here.

.

Read More......

Make the first web site in your life

Posted by Planeta Srbija | 1.5.08 | | 0 comments »

What is a minimum knowledge?

To be honest, you don´t have to know anything about websites to make your first one. You can for example save any MS Word document as .htm or .html. The result won´t be spectacular depending on how stylish was the document itself. Pictures and other page formatting will be lost but the difference between diletants and experts makes very often small details. Here we are going to discuss some of them.

First step:
The basic thing of making a web site, or web page, is to start with HTML. There are two ways for that: by reading and implementing your knowledge after that, or by doing experiments and see what´s going to happen -which is the method most of us prefer, I guess. Great way to read about a lot of things is >here. There is no need of buying books, in this case it´s waste of money. The best things are always free J!

My first choice for making a web page is Adobe Dreamweaver CS3 (formerly Macromedia Dreamweaver 8) but you can also use MSOffice FrontPage (at least 2003) or the next generation of it called Expression Web. There is a bunch of free software on the internet (try to Google) but I´ve never used it. Dreamweaver was for a long time free too, and I got familiar working with it.

Before starting with our work it's very recommendable to thing first about what would be the best structure of the web site, how many "main pages" should it consist of etc. You shoud know that only what's visible is accesible for visitors. So there should be a menu. And we also need a banner – it's your logo on the top of the page.

Let's start:

Every html web page is based on tables! Remember that. Everything you want toshow within your web page should fit inside tables. Making tables is very similar to those in Word. In our example (menu, banner and place for text) the page structure shuold look like this.

How to do it will be the next post!

Read More......

Take a look on my other postings: