If you want to show HTML code within your post, you have to change entities like <, > or ".
Here is online tool
Showing posts with label HTML. Show all posts
Showing posts with label HTML. Show all posts
If you want PNG pictures to have transparency on your web page, use this simple method:
1) Copy this code and paste it into yout notepad:
/*
Correctly handle PNG transparency in Win IE 5.5 & 6.
http://homepage.ntlworld.com/bobosola. Updated 18-Jan-2006.
Use in <HEAD> with DEFER keyword wrapped in conditional comments:
<!--[if lt IE 7]>
<script defer type="text/javascript" src="png.js"></script>
<![endif]-->
*/
var arVersion = navigator.appVersion.split("MSIE")
var version = parseFloat(arVersion[1])
if ((version >= 5.5) && (document.body.filters))
{
for(var i=0; i<document.images.length; i++)
{
var img = document.images[i]
var imgName = img.src.toUpperCase()
if (imgName.substring(imgName.length-3, imgName.length) == "PNG")
{
var imgID = (img.id) ? "id='" + img.id + "' " : ""
var imgClass = (img.className) ? "class='" + img.className + "' " : ""
var imgTitle = (img.title) ? "title='" + img.title + "' " : "title='" + img.alt + "' "
var imgStyle = "display:inline-block;" + img.style.cssText
if (img.align == "left") imgStyle = "float:left;" + imgStyle
if (img.align == "right") imgStyle = "float:right;" + imgStyle
if (img.parentElement.href) imgStyle = "cursor:hand;" + imgStyle
var strNewHTML = "<span " + imgID + imgClass + imgTitle
+ " style=\"" + "width:" + img.width + "px; height:" + img.height + "px;" + imgStyle + ";"
+ "filter:progid:DXImageTransform.Microsoft.AlphaImageLoader"
+ "(src=\'" + img.src + "\', sizingMethod='scale');\"></span>"
img.outerHTML = strNewHTML
i = i-1
}
}
}
2)Save this file as: png.js and put it somwhere on your website. For example in root.
3) Put on each page of your website which should show transparent PNGs somewhere within <head> section this code:
<!--[if lt IE 7.]>Read More......
<script defer type="text/javascript" src="png.js"></script>
<![endif]-->
If you'd rather like to have your page source as clean as possible then you want to keep your scripts separately.
1. Make a folder and name it like "scripts" (or whatever).
2. Take the scriptcode and paste it in notepad! For example it looks like:
<script type="text/javascript">
function nextQuote(){
var result = new Array(6);
result=jsonrpc.slideQuotes.getNextQuote();
document.getElementById('quoteBody').innerHTML=result[0];
document.getElementById('quoteHeading').innerHTML=result[1];
document.getElementById('quotePrevious').innerHTML=result[4];
document.getElementById('quoteNext').innerHTML=result[5];}
</script>
Delete the red part and save the document as "quoteSlideshow.js"
3. Put this document into your "scripts" folder.
4. In your source code (on your page) there where you want to use this script put following string:
<script type="text/javascript" src="/scripts/quoteSlideshow.js"></script>Read More......
Č &# 268; č &# 269;
Ć &# 262; ć &# 263;
Š &# 352; š &# 353;
Ž &# 381; ž &# 382;
Đ &# 272; đ &# 273;
No space between: &# and Nr!
By the way, you might need some time this one:
< with <
> with >
" with "
And the complete list HERE
HTML works pretty logical for us humans. It's a kind of text which browsers read from top to bottom and from left to right. First thing you will notice is that every command starts with "<>" and ends with "</>". It's called TAGS. The complete list of tags is shown here.
But you can learn about the tags "on the fly" and use design view when opening a Dreamweaver. You can also use split view and watch what's heppening in the upper screen (what tags appear) when working in the lower. Very important is that every HTML document starts with:
<html>
<head>
<meta http-equiv="Content-Type" content="text/html; charset=utf-8" />
<title>your-page-title</title>
</head>
<body>
.
.
.
and ends with:
</body>
</html>
Every opened tag must be closed at some time. Opening tag is for example: <title> and closing tag is: </title>. You should close tags by exactly the same order they've been opened. And yes, you can use multiple tags one after another.
In my first post I suggested the page structure with banner, left sidebar for navigation thru the web site and main central "window" for everything else (text and pictures).
We need a table. In Dreamweaver (FrontPage or Expression Web is pretty similar) go to: Insert/Table. Choose 2 Rows, 2 Columns, Table width: 800 pixel, Border: 1 pix, and than click OK.
Selact first row, right mouse, go to option "Table" and than click "Merge". Then pull the middle line of the second row to the left, lets say to 200 pixel. Now we have our main structure. And the source code in the upper window (if you use split view) should look like this:
<!DOCTYPE html PUBLIC "-//W3C//DTD XHTML 1.0 Transitional//EN" "http://www.w3.org/TR/xhtml1/DTD/xhtml1-transitional.dtd">
<html xmlns="http://www.w3.org/1999/xhtml">
<head>
<meta http-equiv="Content-Type" content="text/html; charset=utf-8" />
<title>Untitled Document</title>
</head>
<body>
<table width="800" border="1" cellspacing="0" cellpadding="0">
<tr>
<td colspan="2"> </td>
</tr>
<tr>
<td width="200"> </td>
<td width="594"> </td>
</tr>
</table>
</body>
</html>
You see, a lot of code was added automaticly. You can place your mice pointer to any of those table cells and insert whatever you want to. In our left sidebar we will put some menu items. Just write it like you would do it inside a MS Word table. For example:
Home
About us
Page no. 1
Page no. 2
Useful links
Note: if using Ctrl+Enter after each word (menu item) there won't be an extra empty row between rows.
Connecting pages of a web site with each other:
It's called linking. In our sidebar we certanly need links to other (future pages of our web site). Select the first word "Home" and then go to Insert/Hyperlink. In the URL field type the name of your first page, which is always "index.html" or "index.htm". URL is in this case: "http://www.your-web-site/index.html". Do it with other "menu items" the same way, but don't leave any space between words in web page names. For example, name the next page as: About_us and link to it like: " http://www.your-web-site/About_us.html". Or yust for testing purposes link it with browse to any other local file on your PC, like .doc, .pdf or other .htm file.
Playing around with your web editor you will pretty soon find out how to change cell color, font size, insert image..etc. You want to read more about it: here.
.
Read More......
But you can learn about the tags "on the fly" and use design view when opening a Dreamweaver. You can also use split view and watch what's heppening in the upper screen (what tags appear) when working in the lower. Very important is that every HTML document starts with:
<html>
<head>
<meta http-equiv="Content-Type" content="text/html; charset=utf-8" />
<title>your-page-title</title>
</head>
<body>
.
.
.
and ends with:
</body>
</html>
Every opened tag must be closed at some time. Opening tag is for example: <title> and closing tag is: </title>. You should close tags by exactly the same order they've been opened. And yes, you can use multiple tags one after another.
In my first post I suggested the page structure with banner, left sidebar for navigation thru the web site and main central "window" for everything else (text and pictures).
We need a table. In Dreamweaver (FrontPage or Expression Web is pretty similar) go to: Insert/Table. Choose 2 Rows, 2 Columns, Table width: 800 pixel, Border: 1 pix, and than click OK.
Selact first row, right mouse, go to option "Table" and than click "Merge". Then pull the middle line of the second row to the left, lets say to 200 pixel. Now we have our main structure. And the source code in the upper window (if you use split view) should look like this:
<!DOCTYPE html PUBLIC "-//W3C//DTD XHTML 1.0 Transitional//EN" "http://www.w3.org/TR/xhtml1/DTD/xhtml1-transitional.dtd">
<html xmlns="http://www.w3.org/1999/xhtml">
<head>
<meta http-equiv="Content-Type" content="text/html; charset=utf-8" />
<title>Untitled Document</title>
</head>
<body>
<table width="800" border="1" cellspacing="0" cellpadding="0">
<tr>
<td colspan="2"> </td>
</tr>
<tr>
<td width="200"> </td>
<td width="594"> </td>
</tr>
</table>
</body>
</html>
You see, a lot of code was added automaticly. You can place your mice pointer to any of those table cells and insert whatever you want to. In our left sidebar we will put some menu items. Just write it like you would do it inside a MS Word table. For example:
Home
About us
Page no. 1
Page no. 2
Useful links
Note: if using Ctrl+Enter after each word (menu item) there won't be an extra empty row between rows.
Connecting pages of a web site with each other:
It's called linking. In our sidebar we certanly need links to other (future pages of our web site). Select the first word "Home" and then go to Insert/Hyperlink. In the URL field type the name of your first page, which is always "index.html" or "index.htm". URL is in this case: "http://www.your-web-site/index.html". Do it with other "menu items" the same way, but don't leave any space between words in web page names. For example, name the next page as: About_us and link to it like: " http://www.your-web-site/About_us.html". Or yust for testing purposes link it with browse to any other local file on your PC, like .doc, .pdf or other .htm file.
Playing around with your web editor you will pretty soon find out how to change cell color, font size, insert image..etc. You want to read more about it: here.
.
What is a minimum knowledge?
To be honest, you don´t have to know anything about websites to make your first one. You can for example save any MS Word document as .htm or .html. The result won´t be spectacular depending on how stylish was the document itself. Pictures and other page formatting will be lost but the difference between diletants and experts makes very often small details. Here we are going to discuss some of them.
First step:
The basic thing of making a web site, or web page, is to start with HTML. There are two ways for that: by reading and implementing your knowledge after that, or by doing experiments and see what´s going to happen -which is the method most of us prefer, I guess. Great way to read about a lot of things is >here. There is no need of buying books, in this case it´s waste of money. The best things are always free J!
My first choice for making a web page is Adobe Dreamweaver CS3 (formerly Macromedia Dreamweaver 8) but you can also use MSOffice FrontPage (at least 2003) or the next generation of it called Expression Web. There is a bunch of free software on the internet (try to Google) but I´ve never used it. Dreamweaver was for a long time free too, and I got familiar working with it.
Before starting with our work it's very recommendable to thing first about what would be the best structure of the web site, how many "main pages" should it consist of etc. You shoud know that only what's visible is accesible for visitors. So there should be a menu. And we also need a banner – it's your logo on the top of the page.
Let's start:
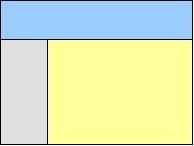 Every html web page is based on tables! Remember that. Everything you want toshow within your web page should fit inside tables. Making tables is very similar to those in Word. In our example (menu, banner and place for text) the page structure shuold look like this.
How to do it will be the next post!
Read More......
Subscribe to:
Posts (Atom)